Showing posts with label Crafts. Show all posts

Wednesday, May 27, 2009

Making the Most of Your Deep Cupboards and Cabinets

Do you have deep cabinets or cupboards that you find are difficult to organize and keep organized? One of my favorite tools is a turn table or lazy susan. I find these are especially great in corner cabinets.

Here's an example of the one in my kitchen.
The bottom shelf stores my spices and the top holds my baking items. I use clear stackable Tupperware containers to get the most of my space. The turn tables makes it easy to find what I need - no digging around.
The green baskets on top hold items that I don't use as frequently. One basket hold baking chocolate, birthday candles and cupcake liners. The other basket contains all my extracts and food colorings.
The are light and easy for me to reach to take out and slide back in.
I do have to maintain my system on occasion and re-organize, especially the spices. Yes, there are times I just quickly shove stuff back in-who doesn't, but it doesn't take too long to take back control.
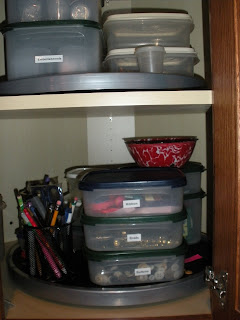
This is a picture of my craft cabinet.
Again, I've used stackable Tupperware containers with labels to hold various embellishments and tools.
This corner cupboard is located right above my main work space. It holds my most used materials, such as adhesives and my favorite scissors.
The top shelf hold less used items and there is plenty of space to grow.
Lazy Susans work for me. For more Works For Me ideas, check out We Are THAT Family.

Saturday, May 02, 2009

National Scrapbook Day is Today: 3 Ways to Celebrate

Today is National Scrapbook Day! It's celebrated the first Saturday of May and was started by Creative Memories. If you are like me, I find myself not doing as much scrapping as I would like. I could give you all kinds of excuses but I won't go there.
  1. If it's not today, pick a time that you will give yourself to scrap. Schedule it. Write in on your calendar. Maybe you can attend a scrapbooking party or just get together with a friend or two.

  2. Organize your scrapbooking space. Have you been avoiding working on your favorite hobby because your space it out of control? Spruce it up! Here's an article I wrote: Organizing Your Craft Space.

  3. Get a new idea to try out. Search online, check out magazines and books, look at friends' layouts, etc. I find that when I am inspired from an idea, my creative juice start flowing. There have been times that I just sat and stared at the blank pages, wondering "why can't I do this?"

What about you? Are you celebrating National Scrapbook Day in any special way? What helps you get back into scrapbooking once you have been away from it for a bit? How do you make time for you hobby?

Wednesday, October 22, 2008

Organizing Fabric

How do you store and organize your fabric so you can find just what you are looking for? Terri over at Funny Farm shared a great idea on organizing fabric. She uses a system of cubies and cardboard.

She says, "You will be amazed at the amount of fabric that can be stored this way. This was from two to three huge plastic storage containers full of fabric.I cannot explain what a time saver this has been for me. I can now see all of my fabric and am able to find it without digging through a bin."

If you use fabric for crafts, sewing or quilting you have to check it out. She has great pictures!

Monday, September 01, 2008

Case Study: Craft Closet


Before

The Problems:
This closet is used to store various craft items, but the items are not easily accessible which makes retrieving and returning items difficult. The space is not used to its fullest potential.


After

The Solutions:
By sorting, adding shelves, using smaller containers with labels, and utilizing an organization system, everything is accessible and easily identified. Now, retrieving and returning supplies are a snap. Craft time is enjoyable again!


This is still one of my favorite organizing projects! The difference is so dramatic. This crafter's handy husband installed the custom shelving unit to fit her needs exactly.

September Newsletter Article.....Organizing Your Craft Space: Part Two


In last month's article, Organizing Your Craft Space: Part One, I taught you how to get started when organizing your craft space/area and supplies. I took you through the first two steps (Sort and Take Out) of my STUFF System™.

For Part Two, I will continue on to give you the final three steps (Utilize Your Space, Fill Containers, and Follow Up) to help transform your crafting area into an organized space that you will love to spend time in.

Remember, my easy-to-use 5 step STUFF System™ enables you to break down any overwhelming organizing project into small and achievable chunks.

Sort
Take Out
Utilize Your Space
Fill Containers
Follow UP

Utilize Your Space
Now that you have the sorting completed and you've eliminated the unwanted, I want you to take a good look at your space. How can you divide the space into zones? Each zone will serve a function. For example, if you sew you might have a supply and storage area, a preparation area, and a sewing area. The tools that you use for each area should be close by or portable so that you can easily move them along with you as your progress on your project.

Here are some questions to help you examine your space:
-Can you add shelves to gain more storage?
-Is there valuable vertical space that is unused?
-Can you take advantage of unused space behind doors?
-Are your work spaces adequate?

Fill Containers
When you have determined how you would like to utilize your space, you will then use containers to keep like items together. Containers can be bins, baskets, boxes, folders, file drawers, racks, shelves, cups, drawers, etc. Containers make it easy for you to retrieve items and to return items to their homes. As a result, you will be able to find what you need when you need it. You can use containers within containers. For example, drawer dividers or small baskets keep tools organized within a drawer. Don't forget to label the containers.

Follow Up
Any time you organize a space, it will require effort from you to keep it organized. The more you use a space, the more maintenance required. I usually prefer to get stuff back in place after I am finished working on a project. Sometimes I have to stop while I am working and do a quick tune-up, other times I just keep on going.

Crafters most often have projects that are on-going for a period of time and so it doesn't make sense to put everything away each time your work on it. It's nice to leave the project out so you can pick up on it in small windows of time. However, if you find that unfinished projects often get buried under new project or clutter, I would suggest creating an area to store projects that need to be completed so you work does not get destroyed.

Your Success to Organization Assignment
If you have made it through the first two steps (Sort and Take Out)- congratulations! Most of the hard work is behind you and you can start on what I call "the fun part"! Don't rush through Step 3, Utilize your Space. If you have a hard time with this step, ask for help! Ask a friend or contact me to see how I can help (I offer my services virtually via email and phone, as well as in-person).

Still need to get started? Read Part One of Organizing Your Craft Space and Procrastination: What's Holding Your Back?. Remember to make sure to set an appointment with yourself. Start with a one or two hour block of time and see what you can accomplish.

Send me an email to let me know about your success!

Monday, August 04, 2008

August Newsletter Article.....Organizing Your Craft Space: Part One

Paula, What organizing tips can you share with me to keep my crafts and craft area under control? Though I enjoy working on my craft projects, the moment I walk into the room, I loose all my ambition when I see the mess. Where do I start?

Craft rooms and spaces can come in all shapes and sizes and they often create challenges for many crafters. Sewing, scrapbooking, quilting, painting, kids crafts, beading - no matter what your choice craft is, the key is to keep the tools and supplies accessible and your workspace functional.

For this and next month's article, I will use my STUFF System™ to give you step-by-step tips to help transform your crafting area into a space that you will love to spend time in. My easy-to-use 5 step STUFF System™ enables you to break down any overwhelming organizing project into small and achievable chunks.

Sort
Take Out
Utilize Your Space
Fill Containers
Follow Up

The size of your space, how much stuff you have, and your ability to make decisions will determine how long it will take you to accomplish your goal. If you find it hard to stay focus, ask a friend with the knack of organization to lend a hand, or contact me to see how I can help you get the job done!

Be Prepared
Before you begin, grab a few boxes or bins for sorting, a recycling bin, and garbage bag. I also like to keep cleaning supplies close by; a clean space stays organized longer! Don't worry about what cute containers you will store your supplies in just yet (that's the forth step!). What about grabbing a radio or your favorite tunes to keep it fun?

Sort
The first step is to sort like items together. This step is usually the longest and messiest, but it is a very important step and essential for successful organization. The act of sorting allows you to see what you have of everything and to get those like or related items together. Be sure to gather any loose or remote items that may have wondered to other areas of your home away from your main workspace.

Give yourself lots of room and work surfaces for this process. I like to work on the floor, but using temporary tables can help reduce bending which can lead to fatigue. Remember, this may take a while if you have lots of stuff so be sure to break down your sorting sessions into smaller chunks of time if needed. For example, maybe you will need two to three one-hour sessions if you find it hard to set aside large chunks of time. This is quite common for those with busy schedules and small children.

You will continue to sort until you have gone through everything. If you have a large space and many items, you might have to break the sorting down by sections. Take time to wipe down empty selves, vacuum those dirty corners, and dust. Think of it as starting with a clean slate.

Take Out
During and after sorting, think about what items you are going to get rid of. Damaged items and stuff you just don't need or use should be tossed, recycled, donated, or shared with friends. Quite often crafters have a tendency to hang onto lots of stuff "just in case". But, if you have items that just don't appeal to your current styles, consider parting with it; it's taking up valuable space.

Is it hard for you to let go? Ask yourself these three questions when you get stuck:
-"Do I use it?"
-"Do I love it?"
-"Do I need it?"

These first two steps will give you a clear picture of the craft items what you have. They will also prepare you and your space for the final three steps of organization, Utilizing Your Space, Filling Containers, and Following Up. Next month in Part Two of Organizing Your Craft Space, I will help you through these final steps to get you into an organized space that you will feel great about and love to be in!

Your Success to Organization Assignment
Do you find it hard to get started? Make sure to set an appointment with yourself. Start with a one or two hour block of time and see what you can accomplish. Each person is different so the length of time will vary. The total time spent on a given craft room can range from 2-16 hours in its entirety, but first focus on that initial session to get started.

Send me an email to let me know about your craft area challenges and success!